Migrating from one marketing automation platform to another is a significant undertaking that requires careful planning, execution, and expertise. Whether you’re seeking enhanced features, improved scalability, or better integration capabilities, taking on a Pardot to Marketo migration represents a strategic decision aimed at elevating your marketing efforts to the next level.
Why Migrate to Marketo?
Marketo offers a robust suite of marketing automation tools and features designed to drive engagement, nurture leads, and optimize marketing performance. From advanced lead scoring and dynamic content personalization to comprehensive reporting and analytics, Marketo equips marketers with the capabilities needed to deliver personalized, targeted campaigns at scale.
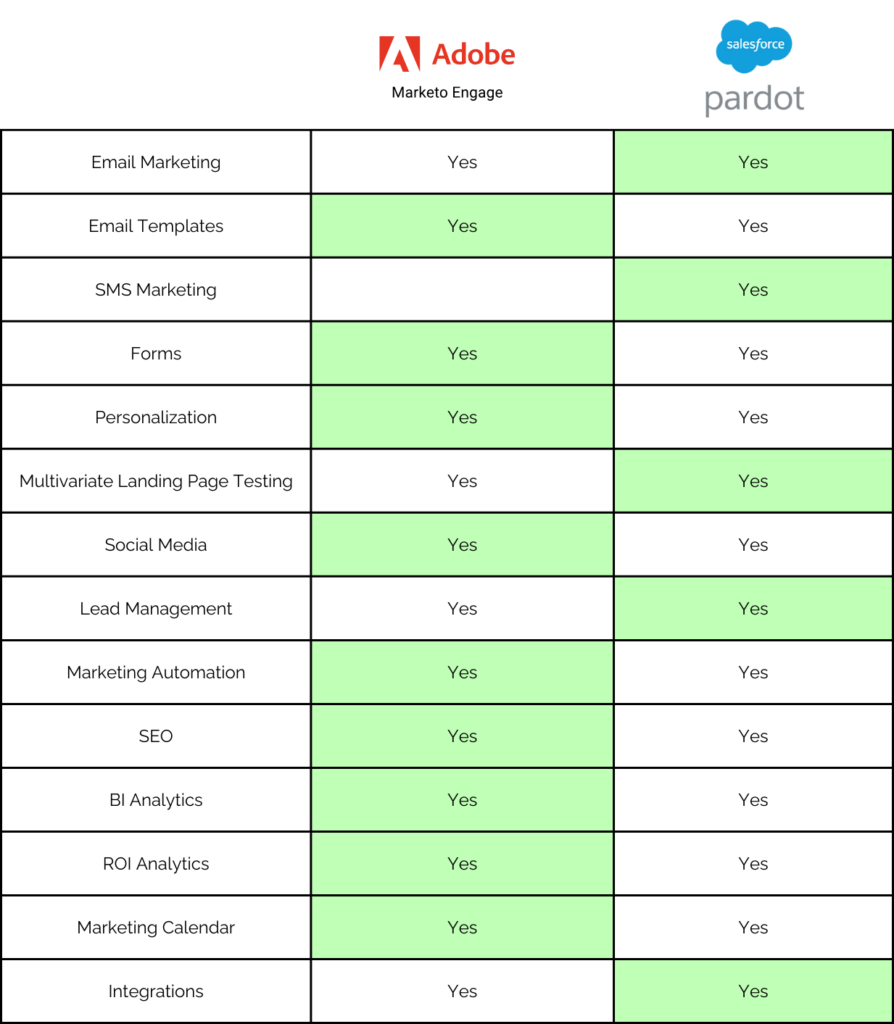
Additionally, Marketo’s seamless integration with Salesforce and other third-party applications enhances workflow efficiency and enables unified data management across your marketing and sales teams. By migrating to Marketo, you gain access to a powerful platform that empowers you to create, automate, and measure the success of your marketing initiatives with precision and effectiveness.
Pre-Migration Preparation
Before embarking on the migration journey from Pardot to Marketo, it’s essential to lay the groundwork and ensure a smooth transition. This section outlines the key steps and considerations to take during the pre-migration preparation phase.
1. Assessing Current Pardot Setup
Begin by conducting a thorough assessment of your current Pardot setup. Document your existing workflows, automation rules, lead scoring criteria, email templates, landing pages, forms, and other assets. This assessment will provide valuable insights into your current marketing processes and help identify areas for improvement in Marketo.
2. Gathering Necessary Information and Assets
Gather all the necessary information and assets required for the migration. This includes contact lists, lead scoring criteria, email templates, landing page designs, form configurations, automation workflows, and any other relevant data. Ensure that you have access to all the necessary login credentials and permissions for both Pardot and Marketo accounts.
3. Communicating with Stakeholders
Communication is key to a successful migration. Engage with key stakeholders, including marketing teams, sales teams, IT departments, and external vendors if applicable. Clearly communicate the goals, timeline, and expected outcomes of the migration process. Address any concerns or questions raised by stakeholders and ensure alignment across all departments.
4. Setting Migration Goals and Timeline
Define clear migration goals and establish a realistic timeline for the transition. Determine the scope of the migration, including which assets and functionalities will be migrated initially and which ones will be phased in later. Set milestones and deadlines to track progress and keep the migration on track.
5. Backup and Data Security
Before proceeding with any data migration, it’s crucial to backup all your data from Pardot. This ensures that you have a copy of your data in case of any unforeseen issues during the migration process. Additionally, prioritize data security throughout the migration process by adhering to best practices and compliance standards to protect sensitive information.
6. Training and Skill Development
Invest in training and skill development for your team members who will be involved in the migration process. Ensure that they are familiar with the functionalities and features of Marketo and provide them with the necessary resources and support to navigate the new platform effectively. Consider offering training sessions, workshops, or online courses to enhance their proficiency in Marketo.
Data Export and Preparation
A crucial step in migrating from Pardot to Marketo is exporting and preparing your data for the transition. This section provides guidance on exporting data from Pardot, cleaning up data, and organizing it according to Marketo requirements.
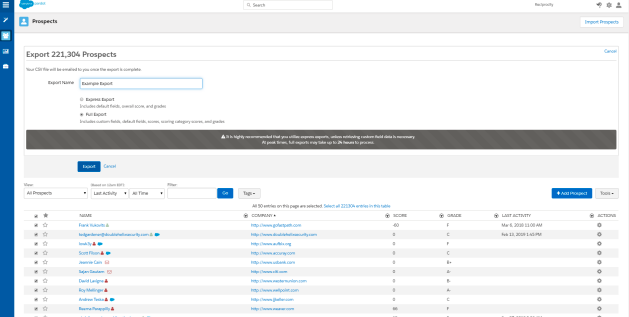
Exporting Contacts and Lists from Pardot
Begin by exporting your contacts and lists from Pardot. Navigate to the relevant sections in your Pardot account to export your contacts and lists. Ensure that you export all necessary fields and data points, including custom fields and segmentation criteria. Consider exporting your data in CSV format for easy compatibility with Marketo.
Cleaning Up Data and Ensuring Data Integrity
Before importing your data into Marketo, it’s essential to clean up your data and ensure its integrity. Remove any duplicate or outdated records, correct formatting errors, and standardize data fields to maintain consistency. Conduct a thorough review of your data to identify and resolve any inconsistencies or inaccuracies.
Organizing Data According to Marketo Requirements
Organize your data according to Marketo’s requirements to facilitate a smooth import process. Review Marketo’s data structure and mapping guidelines to ensure that your data is formatted correctly. Create custom fields in Marketo to accommodate any additional data points or fields not present in Pardot. Follow naming conventions and data formatting standards to maintain consistency across your database.
Exporting Other Relevant Data
In addition to contacts and lists, consider exporting other relevant data from Pardot, such as lead scoring criteria, automation rules, email templates, and landing page designs. Document these elements and ensure that they are accurately replicated in Marketo. This will help maintain continuity in your marketing processes and workflows post-migration.
Backup and Data Security
Before proceeding with data export and preparation, it’s essential to backup your data from Pardot. This serves as a safeguard in case of any data loss or corruption during the migration process. Prioritize data security throughout the export and preparation phase to protect sensitive information and adhere to compliance standards.
Setting Up Marketo Environment
Setting up your Marketo environment lays the foundation for a successful migration and ensures that you can seamlessly transition your marketing operations from Pardot to Marketo. This section outlines the essential steps to configure your Marketo account and prepare it for data migration and asset creation.
Account Setup and Configuration
Begin by creating a new account in Marketo or accessing your existing account if you already have one. Ensure that you have the necessary permissions and access rights to configure the account settings. Set up account preferences, including time zone, language, and default settings, to align with your organization’s requirements.
Creating Necessary Custom Fields and Lists
Next, create any custom fields and lists in Marketo that are required to accommodate your data from Pardot. Review the data mapping and field requirements to ensure that you capture all relevant information accurately. Customize field labels, data types, and validation rules as needed to match your data schema.
Configuring User Roles and Permissions
Define user roles and permissions in Marketo to control access to various features and functionalities. Assign roles to users based on their responsibilities and privileges within the organization. Set up role-based permissions to restrict access to sensitive data and critical operations, ensuring data security and compliance.
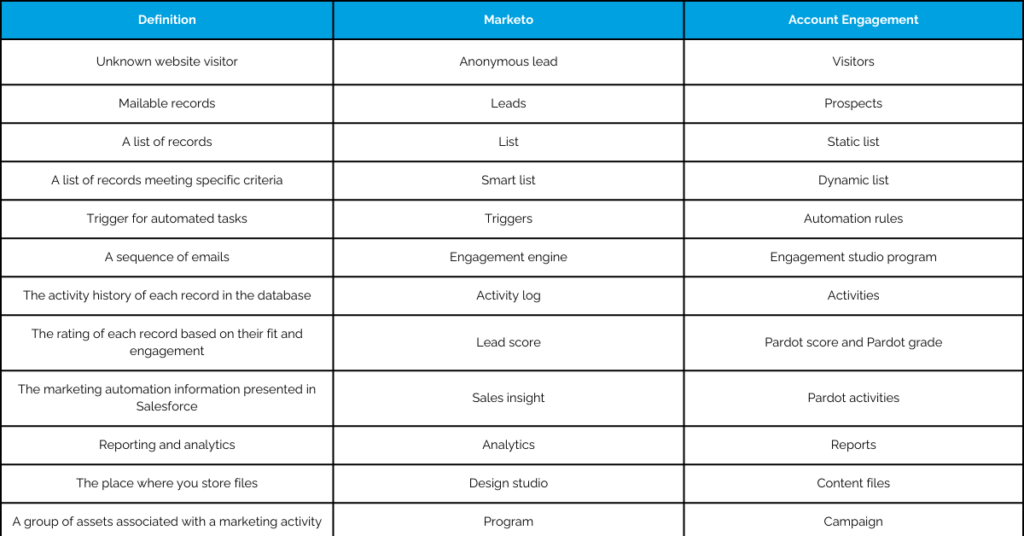
4. Familiarizing with Marketo Interface and Terminology
Take the time to familiarize yourself and your team members with the Marketo interface and terminology. Explore the different modules, tabs, and sections within Marketo to understand how data is organized and managed. Review Marketo’s documentation and resources to learn about key features, workflows, and best practices.
5. Integration with Salesforce and Other Third-party Applications
If you’re integrating Marketo with Salesforce or other third-party applications, configure the integration settings to enable seamless data synchronization and workflow automation. Follow the integration guides and documentation provided by Marketo to set up the integration securely and efficiently.
6. Data Import and Validation
Before proceeding with data migration, perform a test import of sample data to validate the import process and ensure data integrity. Review the imported data in Marketo to verify that it matches the source data from Pardot accurately. Resolve any issues or discrepancies identified during the validation process before proceeding with the full data migration.
Migrating Contacts and Lists
Re-creating Lists in Marketo
Start by re-creating your lists in Marketo to mirror the segmentation criteria and audience groups you have established in Pardot. Navigate to the Database section in Marketo and create new static or smart lists based on your segmentation requirements. Consider using naming conventions to organize your lists systematically and facilitate easy identification.
Importing Contacts into Marketo
Once you’ve recreated your lists, proceed with importing your contacts into Marketo. Export your contacts from Pardot in CSV format, ensuring that all relevant fields and data points are included. Use Marketo’s import tool to upload your CSV file and map the fields to their corresponding Marketo fields.
Validating Imported Data
After importing your contacts into Marketo, validate the imported data to ensure accuracy and completeness. Review the imported contacts in Marketo to verify that all fields and data points have been transferred correctly. Pay special attention to custom fields and segmentation criteria to ensure that your lists are accurately populated.
Recreating List Segmentation and Filters
Once your contacts are imported into Marketo, recreate any list segmentation and filters that you had established in Pardot. Use Marketo’s segmentation tools to define rules and criteria for segmenting your audience based on demographics, behavior, and engagement. Test your segmentation rules to ensure that contacts are correctly segmented into the appropriate lists.
Data Cleanup and Deduplication
As part of the migration process, take the opportunity to clean up your contact data and deduplicate records. Remove any duplicate or outdated contacts, correct formatting errors, and standardize data fields to maintain consistency. Use Marketo’s data management tools to identify and merge duplicate records, ensuring a clean and accurate database.
Testing and Quality Assurance
Before fully transitioning to Marketo, conduct thorough testing and quality assurance to ensure that your contacts and lists are accurately migrated and segmented. Test the functionality of your lists, segmentation rules, and filters to verify that contacts are correctly categorized and targeted. Address any issues or discrepancies identified during testing before proceeding with live campaigns.
Migrating Lead Scoring
Lead scoring plays a crucial role in prioritizing leads, identifying sales-ready prospects, and maximizing the effectiveness of marketing efforts. Migrating lead scoring criteria from Pardot to Marketo requires careful consideration and planning to ensure a seamless transition.
Documenting Current Lead Scoring Criteria from Pardot
Begin by documenting your current lead scoring criteria and point assignments from Pardot. Review your existing lead scoring model, including scoring rules, thresholds, and criteria for assigning points. Document any custom fields, behavioral triggers, or engagement activities that are factored into your lead scoring algorithm.
Recreating Lead Scoring Model in Marketo
Using the documentation from Pardot as a reference, recreate your lead scoring model in Marketo. Navigate to the Lead Scoring section in Marketo and define scoring rules and criteria based on your documented criteria. Consider factors such as demographics, behavior, engagement, and intent signals to assign points to leads.
Customizing Lead Scoring System in Marketo
Take advantage of Marketo’s flexibility to customize your lead scoring system to fit your organization’s unique needs and objectives. Experiment with different scoring models, thresholds, and point assignments to optimize lead qualification and prioritization. Consider incorporating predictive lead scoring or machine learning algorithms for more advanced lead scoring capabilities.
Testing and Validating Lead Scoring Rules
Before fully implementing your lead scoring model in Marketo, conduct testing and validation to ensure its accuracy and effectiveness. Test various scenarios and use cases to verify that leads are scored appropriately based on their behavior and engagement. Adjust scoring rules and criteria as needed to fine-tune your lead scoring model for optimal performance.
Integrating Lead Scoring with Sales Processes
Ensure seamless integration between your lead scoring model and your organization’s sales processes and workflows. Collaborate with sales teams to align lead scoring criteria with lead qualification criteria and sales readiness indicators. Implement lead scoring alerts, notifications, and workflows to facilitate lead handoff and follow-up between marketing and sales teams.
Continuous Monitoring and Optimization
Lead scoring is not a one-time activity but an ongoing process that requires continuous monitoring and optimization. Regularly review and analyze lead scoring data to identify trends, patterns, and opportunities for improvement. Adjust scoring rules, criteria, and point assignments based on performance metrics and feedback from sales teams to refine your lead scoring model over time.
Migrating Email Content
1. Assess Your Email Assets:
- Begin by cataloging all your existing email assets in Pardot. This includes newsletters, promotional emails, drip campaigns, and any other email communications.
- Analyze the complexity of each email to determine the best approach for migration.
2. Review and Refine:
- Take the opportunity to review your existing email content and identify areas for improvement. Consider updating outdated designs, refreshing copy, or optimizing for mobile responsiveness.
- Refine your email templates and content to align with your branding and messaging strategy.
3. Export Email Templates:
- Export your email templates from Pardot, ensuring you capture both HTML and text versions if applicable.
- Save any custom design elements or images associated with your templates to ensure they’re readily available for import into Marketo.
4. Recreate Email Templates in Marketo:
- In Marketo, navigate to the Design Studio and create new email templates based on your Pardot designs.
- Utilize Marketo’s drag-and-drop editor or HTML editor to recreate your email templates, ensuring they maintain the same look and feel as your originals.
5. Import Content and Assets:
- Import your email content, including text, images, and other assets, into Marketo.
- Ensure that all images and files are properly linked and accessible within Marketo’s content library.
6. Test Across Devices and Platforms:
- Before deploying your emails, thoroughly test them across different devices, email clients, and platforms.
- Check for formatting issues, broken links, and rendering discrepancies to ensure a seamless user experience.
7. Set Up Dynamic Content (If Applicable):
- If you’re using dynamic content in your emails, recreate these elements in Marketo using Marketo’s dynamic content features.
- Ensure that dynamic content rules and segmentation criteria are accurately replicated in Marketo.
8. Review and Approve:
- Once your email content is migrated and tested, review it one final time before deploying.
- Obtain necessary approvals from stakeholders or team members before scheduling your email campaigns in Marketo.
9. Monitor Performance and Iterate:
- After deploying your emails, monitor their performance using Marketo’s analytics tools.
- Analyze open rates, click-through rates, and conversion metrics to optimize your email campaigns over time.
Migrating Automation Campaigns
1. Audit Existing Automation Workflows:
- Begin by conducting a thorough audit of your existing automation workflows in Pardot. Document the structure, triggers, actions, and logic of each workflow to understand its functionality.
2. Identify Equivalent Functionality in Marketo:
- Familiarize yourself with Marketo’s automation capabilities, including triggers, flow actions, and smart campaigns.
- Identify equivalent functionality in Marketo for each automation workflow in Pardot, taking note of any differences or limitations.
3. Recreate Automation Sequences in Marketo:
- Using the documentation from Pardot as a reference, recreate your automation sequences in Marketo.
- Navigate to the Marketing Activities section in Marketo and create new smart campaigns or programs to replicate your Pardot workflows.
4. Map Triggers, Actions, and Logic:
- Map out the triggers, actions, and logic of each automation workflow from Pardot to Marketo.
- Ensure that triggers are accurately defined to initiate the automation, and actions are set up to execute the desired tasks or communications.
5. Test and Validate Automation Workflows:
- Before fully transitioning to Marketo, test each automation workflow thoroughly to ensure its accuracy and functionality.
- Test various scenarios and use cases to verify that triggers are firing correctly, actions are being executed as expected, and logic is functioning as intended.
6. Compare and Optimize:
- Compare the performance of your automation workflows in Marketo with their counterparts in Pardot.
- Identify areas for optimization or improvement and make adjustments as needed to enhance the effectiveness of your automation campaigns.
7. Train Users and Stakeholders:
- Provide training and support to users and stakeholders who will be managing and executing automation campaigns in Marketo.
- Ensure that they understand the new platform and how to navigate and utilize its automation features effectively.
8. Monitor and Iterate:
- After migrating your automation campaigns to Marketo, monitor their performance and effectiveness using Marketo’s reporting and analytics tools.
- Continuously iterate and optimize your automation workflows based on performance metrics and feedback from users and stakeholders.
Migrating Landing Pages
1. Inventory Your Existing Landing Pages:
- Begin by cataloging all your existing landing pages in Pardot. Take note of their URLs, designs, content, and any associated assets such as forms or images.
2. Assess Landing Page Complexity:
- Evaluate the complexity of each landing page to determine the best approach for migration. Consider factors such as design complexity, form integrations, dynamic content, and custom HTML.
3. Export Landing Page Designs and Assets:
- Export your landing page designs and associated assets, including images, videos, and custom CSS, from Pardot. Ensure that you have access to all necessary files for import into Marketo.
4. Recreate Landing Pages in Marketo:
- In Marketo’s Design Studio, create new landing pages based on your designs from Pardot. Utilize Marketo’s drag-and-drop editor or HTML editor to replicate the layout and structure of your landing pages.
5. Customize Templates and Content:
- Customize your landing page templates and content to align with your branding and messaging strategy. Update any outdated designs, refresh copy, and optimize for mobile responsiveness as needed.
6. Import Assets and Forms:
- Import any images, videos, or other assets associated with your landing pages into Marketo’s content library.
- Recreate any forms used on your landing pages in Marketo, ensuring that they are properly integrated and functional.
7. Test Across Devices and Platforms:
- Before deploying your landing pages, thoroughly test them across different devices, browsers, and platforms.
- Check for formatting issues, broken links, and functionality discrepancies to ensure a seamless user experience.
8. Redirect URLs (If Necessary):
- If you’re changing the URLs of your landing pages during the migration, set up redirects from your old Pardot URLs to the new Marketo URLs to ensure continuity in your campaigns.
9. Review and Approve:
- Once your landing pages are migrated and tested, review them one final time before deploying.
- Obtain necessary approvals from stakeholders or team members before launching your campaigns in Marketo.
Migrating Forms
1. Assess Your Existing Forms:
- Begin by assessing all your existing forms in Pardot. Take note of their types, fields, configurations, and any associated landing pages or campaigns.
2. Evaluate Form Complexity:
- Evaluate the complexity of each form to determine the best approach for migration. Consider factors such as the number of fields, conditional logic, progressive profiling, and form styling.
3. Export Form Configurations:
- Export your form configurations and settings from Pardot, ensuring that you capture all necessary details for import into Marketo.
- Save any custom CSS or JavaScript used in your forms to ensure they’re readily available for import into Marketo.
4. Recreate Forms in Marketo:
- In Marketo’s Marketing Activities section, create new forms based on your configurations from Pardot. Utilize Marketo’s form builder to replicate the fields, layout, and styling of your forms.
5. Customize Form Styling and Settings:
- Customize the styling and settings of your forms in Marketo to align with your branding and user experience preferences. Update field labels, placeholders, and validation messages as needed.
6. Set Up Form Actions and Integrations:
- Configure form actions and integrations in Marketo to define what happens after a form submission. Set up form submission notifications, lead routing rules, and integrations with CRM systems or other platforms.
7. Test Form Functionality:
- Before deploying your forms, thoroughly test their functionality to ensure they’re working as expected. Test form submissions, validation rules, error handling, and any integrations or actions triggered by form submission.
8. Embed Forms on Landing Pages:
- Embed your newly created forms on the corresponding landing pages in Marketo. Ensure that the forms are properly integrated and functional within the landing page environment.
9. Redirect Form Submissions (If Necessary):
- If you’re changing the form submission URLs during the migration, set up redirects from your old Pardot form submission URLs to the new Marketo URLs to ensure continuity in your campaigns.
10. Review and Approve:
- Once your forms are migrated and tested, review them one final time before deploying. Obtain necessary approvals from stakeholders or team members before launching your campaigns in Marketo.
Migrating Files
1. Inventory Your Files:
- Start by creating an inventory of all the files stored in your Pardot account. This includes images, documents, PDFs, videos, and any other assets used in your marketing campaigns.
2. Assess File Usage and Dependencies:
- Assess the usage and dependencies of each file to determine its importance and relevance for migration. Identify files that are actively used in your campaigns and those that can be archived or removed.
3. Export Files from Pardot:
- Export your files from Pardot, ensuring that you capture all necessary assets for import into Marketo. Organize your files into appropriate folders or categories to facilitate the migration process.
4. Organize Files in Marketo:
- In Marketo’s Design Studio, create new folders or directories to organize your files based on their type, purpose, or campaign usage.
- Upload your exported files to the corresponding folders in Marketo, ensuring that they are properly organized and accessible.
5. Relink Files in Campaigns and Content:
- Review your marketing campaigns, emails, landing pages, and other content to identify any references to files hosted in Pardot.
- Relink these files to the corresponding assets in Marketo to ensure that they remain functional and accessible in your campaigns.
6. Update URLs and Links (If Necessary):
- If you’re changing the URLs or links to your files during the migration, update any references or hyperlinks in your campaigns to point to the new Marketo URLs.
- Set up redirects from your old Pardot file URLs to the new Marketo URLs to ensure continuity in your campaigns.
7. Test File Accessibility:
- Before deploying your campaigns, test the accessibility of your files to ensure they’re loading correctly and are accessible to your audience.
- Test file downloads, embedded media, and any other interactions to verify that the files are functioning as expected.
8. Review and Approve:
- Once your files are migrated and tested, review them one final time before deploying your campaigns. Obtain necessary approvals from stakeholders or team members before launching your campaigns in Marketo.
Succeed with Stack Moxie
83% of data migrations either fail outright or exceed their allotted budgets and implementation schedules.
Stack Moxie helps you beat the odds with automated tests that protect your systems and help you achieve a successful migration. Key Stack Moxie tests for migrations include:
- Regression Testing: Ensures that new changes haven’t adversely affected existing functionalities.
- Lead Lifecycle: Monitors the journey of leads to ensure no disruptions or errors.
- GDPR Data Flows: Ensures compliance with data protection standards.
- Lead Mapping: Tracks the alignment and accuracy of lead data.
- MQL Monitoring: Keeps a close eye on Marketing Qualified Leads for any discrepancies.
- Form Regression Testing: Validates the functionality of forms post-migration.
As your team constructs and rolls out migration assets, tests and validations can be built concurrently. This synchronized approach means the moment an asset is deployed, it’s immediately tested. The result? A significant reduction in testing time and the prompt detection of any disruptions.
Additionally, after migrating data, workflows, and integrations, there are fundamental QA tests you should run to ensure the new platform functions as expected. This phase identifies any issues before going live, ensuring a seamless transition for users and maintaining business continuity.
- Functionality Testing: Verify that all features work correctly in the new environment, including data processing, workflow execution, and user interactions.
- Data Verification: Check the accuracy and integrity of migrated data. Ensure all critical data is correctly transferred and accessible.
- Integration Testing: Test the functionality of integrated third-party tools to confirm they work seamlessly with the new platform.
- User Acceptance Testing (UAT): Involve end-users to validate the migration from a user perspective. Gather feedback on usability and address any concerns.
- Performance Testing: Assess the system’s performance under various conditions to ensure it meets operational requirements.
Document any issues encountered during testing, prioritize them based on their impact, and address them promptly. Repeat testing as necessary until all critical issues are resolved, ensuring the platform is reliable and ready for deployment.